
轻量web服务
介绍
FastAPI 是一个用于构建 API 的现代、快速(高性能)的 web 框架,使用 Python 3.6+ 并基于标准的 Python 类型提示。
FastAPI 框架,高性能,易于学习,高效编码,生产可用
文档地址:fastapi
使用
安装
pip install fastapi
pip install uvicorn  # 启动方式
构建app
# main.py
from fastapi import FastAPI

app = FastAPI()

@app.get("/")
async def root():
    return {"message": "Hello World"}
启动
uvicorn main:app --reload
或者以代码方式启动:
# main.py
uvicorn.run(app, host="127.0.0.1", port=8000, log_level="debug", loop="asyncio")
访问
在游览器内输入localhost:8000即可
作为saya模块使用并进行交互
此处仅仅为了进行web相关的学习,目前不具备任何实用的功能
模块目录
我尝试使用bootstrap作为web基础,但似乎无法访问到...
static中存放静态文件,templates中存放模板html文件
root@Graia:/home/bot/modules# tree WebApi/
WebApi/
├── __init__.py

├── api.py
├── static
│   ├── css
│   │   ├── bootstrap-grid.css
│   │   ├── ......
│   │   └── bootstrap.rtl.min.css.map
│   └── js
│       ├── @eaDir
│       │   ├── bootstrap.bundle.js@SynoEAStream
│       │   ├── ......

│       │   └── bootstrap.min.js@SynoEAStream
│       ├── ......

│       └── bootstrap.min.js.map
└── templates
    ├── index.html
    ├── log.html
    └── modules.html
运行方式
fastapi是一个处理请求和发送的循环,无法在已经是个loop的brocast环境中运行,也许有注入运行的方法但是我没有找到;最后使用了线程方式运行一个fastapi服务
def run_api():
    app_host = route_path.split(':')
    # uvicorn.run(app, host="192.168.0.5", port=8045, log_level="debug", loop="asyncio")
    uvicorn.run(app, host=app_host[0], port=int(app_host[1]), log_level="debug", loop="asyncio")

def thred_run_api(saya: Saya):
    global apisaya  # 此处是为了导入saya模块对象
    apisaya = saya
    run_loop_thread = Thread(target=run_api)
    run_loop_thread.start()
功能&实现
由于是学习目的,目前仅尝试了三个页面
- 一个显示运行时间的主页
- 一个显示运行了多少模块的展示页
- 一个实时显示日志的页面
主要框架我使用了bootstrap页面生成器,然后对着需求修改html和添加js即可
Jinja2模板渲染
需要实现根据请求发送带着信息的html页面,就需要模板来渲染
在html文件上:
                <div class="jumbotron">
                    <h1>
                        欢迎来到CUAVbot
                    </h1>
                    <p>
                        本次运行时间:{{ now_runtime }}
                    </p>
                    <p>
                        总共运行时间:{{ all_runtime }}
                    </p>
                    <p>
                </div>
定义路由:
@app.get("/")
async def get_index(request: Request):

    return t.TemplateResponse(
        "index.html", {
            "request": request,
            "now_runtime": "显示本次运行时长",
            "all_runtime": "显示总运行时长"

        }
    )
这样每次请求就会发送对应的信息
主页
如上,仅展示标题和运行时间
模块页面
在html上定义表格,并在tbody内等待渲染(safe标签让Jinja2不对内容进行转义,可正常显示html标签)
                <table class="table">
                    <thead>
                        <tr>
                            <th>
编号
</th>
                            <th>
模块
</th>
                            <th>
作者
</th>
                            <th>
说明
</th>
                        </tr>
                    </thead>
                    <tbody>{{ sayatable | safe }}</tbody>
定义路由:
@app.get("/modules")
async def get_modules(request: Request):
    table_str = ''
    modules_temp = "<tr {}><td>{}</td><td>{}</td><td>{}</td><td>{}</td></tr>"
    class_temp = 'class="success"'
    channels = apisaya.channels
    trager = 1
    for channel_name, channel_object in channels.items():
        table_str += modules_temp.format(
            class_temp if (trager % 2) == 0 else "",
            trager,
            channel_object._name,
            channel_object._author[0],
            channel_object._description.replace("\n", "<br />")  # 注意用换行标签替换字符
        )
        trager += 1
    return t.TemplateResponse(
        "modules.html",
        {"request": request, "sayatable": table_str}
    )
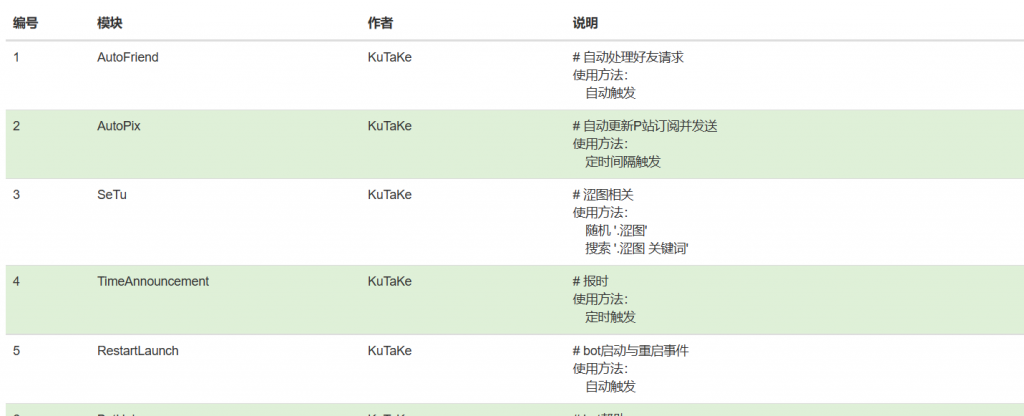
效果
日志页面
要求实时显示的话对我这种小白就有点复杂,首先是尝试在html中嵌入js来循环请求日志,但失败了
最后是用了websockets方式来循环请求,请求是服务端来发送的,前端只进行接收
首先在html上:
                            <div id="bot_log">
                            </div>
......
<script type="text/javascript">
        function WebSocketTest(){
            var ws = new WebSocket("ws://localhost:8045/log/flash");
            ws.onmessage = function (evt){
                document.getElementById("bot_log").innerHTML = evt.data;
            }
        }
        WebSocketTest()
</script>
WebSocket.onmessage是定义对接收信息的处理
然后定义一个连接管理对象
class ConnectionManager:
    def __init__(self):
        # 存放激活的ws连接对象
        self.active_connections: List[WebSocket] = []

    async def connect(self, ws: WebSocket):
        # 等待连接
        await ws.accept()
        # 存储ws连接对象
        self.active_connections.append(ws)

    def disconnect(self, ws: WebSocket):
        # 关闭时 移除ws对象
        self.active_connections.remove(ws)

manager = ConnectionManager()
最后定义路由
log_file_path = os.popen("ls -t ./log/ | head -n 1").read()

@app.websocket("/log/flash")
async def flash_log(websocket: WebSocket):
    await manager.connect(websocket)
    try:
        while True:
            log_str = os.popen(f"tail -n 100 ./log/{log_file_path}").read().replace("\n", "<br />")
            await websocket.send_text(log_str)
            await asyncio.sleep(5)
    except WebSocketDisconnect:
        manager.disconnect(websocket)

@app.route('/log')
async def get_log(request: Request):
    return t.TemplateResponse(
        "log.html",
        {"request": request, "base_href": base_href}
    )
很简陋但是也算完成了需求
一些坑
fastapi的websockets在虚拟环境下运行似乎会报错,不知道是什么原因,但就是一直报错弄的差点放弃了websockets